Looking for some fun and new ways to display your vintage rolling pin collection? I love collecting vintage rolling pins. You Can find them at flea markets, online, and even at yard sales.
If you have been collecting vintage rolling pins for a while and need a fun new way to display them then click here to check out some of Rebecca's ideas on how to affordable display your vintage rolling pin collection.
I personally love vintage rolling pins and love using them in all sizes to make fun displays!
Click here to see ideas from Rebecca on how to display your vintage rolling pin collection.
Friday, March 30, 2007
Monday, March 26, 2007
Vintage Frame Cork Board Project

Have a vintage frame? Want to turn it into a vintage lookign cork board for your home office?
Thursday, March 22, 2007
Vintage Board Game Spice Rack
This simple Vintage Game Board Spice Rack is a great way to add some stylish storage to your retro or vintage kitchen. The vintage look is timeless and well suited for many different styles. The added bonus is the extra storage this simple Vintage Game Board Spice Rack woodworking project will add to your vintage kitchen!
You can make this simple Vintage Game Board Spice Rack for about $100 or less, depending on how much you end up paying for your vintage game board.
To Make a Vintage Game Board Spice Rack You Will Need:
2X4’s
Plywood
Screws
Power drill
Drill bits
Primer
Paint
Picture hanging Hooks (optional)
Paint brushes (in a variety of sizes)
Magnetic door hook
Piano Hinge
Vintage Game board
Now, the first step is to measure your vintage game board. Measure how wide and tall it is.
Use your 2X4’s to build a frame the exact same size. Use you wood screws to screw the pieces of 2X4’s together like a box frame. Predrill the holes for the screws with your power drill to keep the wood from splitting.
Now, cut your plywood to the same size as your vintage game board as well. You will need 2 pieces of this.
Screw the plywood onto the back of the wood frame you built. You can do this step gain by predrill holes through the plywood another 2X4” frame. Insert your screws to hold them together.
Now, the other piece will be for the door of the vintage spice rack.
Install one shelf half way between the tops and bottom of the spice rack. Simply cut a 2X4 to fit inside the spice rack. You can screw it into place from the back.
Now, attach the other sheet of plywood to the front of the box. Do this by install a piano hinge on the left side of the frame. Attach one side to the frame you built and one side of the hinge to the vintage window.
On the right side install your magnetic door hook. You could also use a hook and eye hook like you used to find on old screen doors.
Now, flip the vintage window box five down. Install your picture hanging hooks on the back of the box. They should be attached into the plywood you put on the back.
Now, flip the box back over and lay it on it’s back on a flat work surface.
Now, lightly sand any areas needed on the wooden box and roof.
Wipe away any dust and prime it out.
Now, once the primer has dried you can paint the inside and outside of the Vintage Game Board Spice Rack.
Now, you need to install you vintage game board on the front of the spice rack. You can use spray adhesive to do this or even drill it into place. Mirror clips would work well and keep you from damaging the vintage board game.
Now, to hang your Vintage Game Board Spice Rack you have a few options. Hooks can also be installed on the sides of the Vintage Game Board Spice Rack. You can also drill it into the wall like a cabinet or simply rest it on your counter.
Check out more DIY Projects By Rebecca
Wednesday, March 21, 2007
Rustic Cabin Home Decor Painted Wood Floors
These Rustic Cabin Wood Floors are the perfect warm and cozy addition to a home office or even a warm family room. You can use this paint technique to update existing wood or laminate floors on a budget.
Creating an antique Rustic Cabin paint finish on Wood Floors on a budget is an easy project that can be accomplished in one weekend. To start this Rustic Cabin Wood Floors project you will need a few different materials from your local home improvement store as well as some time.
Those wood or plain fake Wood Floors are perfect for antiquing in to a Rustic Cabin look no matter where you live. If you have old or outdated Wood Floors and just want to change the color or look this Rustic Cabin paint resurfacing process is also good.
Here is a list of supplies you will need to start resurfacing your old Rustic Cabin Wood Floors:
Primer Paint: Brown and Hunter Green or Brown and Barn RedRoller paint brushes A variety of 2”, 3”, or 4” paint brushes Wood stain Glaze Sandpaper Drop clothes Cheap, outdated, or plain Bookcases
Now, start sanding the surface of your plain Wood Floors. You can rent a sander to save time. You want to remove the shine.
Once you have the surface lightly sanded, you should wipe off the dust with a clean dry clothe. An old white t-shirt will work perfectly here. You can also mop to save time.
Now, you are ready to put a coat of primer. If you are painting laminate Wood Floors this is a very important step. Your resurfacing Rustic Cabin painting technique will not stick to your surface if you don’t sand and then prime your Wood Floors.
If you want a rough more Rustic Cabin look try putting the primer on with one of the 4” brushes. This will give texture and create the look of real wood. If you prefer the smoother look you can roll the paint on with any type of paint roller. A foam roller will create the smoothest surface.
Allow your primer to dry completely.
Put on a coat of your base paint. Now, this paint should be a nice dark chocolate brown. You will be seeing it when the whole rustic cabin paint treatment is finished.
This paint should not be the actual color you want your Wood Floors to end up, but the color you want to show through when you rough up the Rustic Cabin Wood Floors.
Now you are ready to paint your Rustic Cabin Wood Floors with the real color you wish them to be. I always recommend painting a color like hunter green or barn red for a rustic cabin look. A mustard yellow would also work.
Don’t be scared to choose a bright color because the antiquing process will tone down the appearance of the Rustic Cabin Décor Wood Floors considerably.
Once your Wood Floor color has dried you are ready to start roughing it up to be more rustic and match the rest of your Rustic Cabin decor. Start by using the sand paper to rough up edges and other areas that would typically be used over time.
Once you have finished sanding the Rustic Cabin Wood floors wipe the surface down with a clean dry cloth. That old white t-shirt will work well here again. You can stop at this point, but if you want to go the extra mile you can use a mixture of ½ wood stain and ½ glaze to darken your piece.
Start by mixing your wood stain and glaze in a plastic container. Use a white rag or another old t-shirt to rub the stain onto the Rustic Cabin Wood floors.
You can do this process until you achieve the Rustic Cabin decor look you want for your Wood floors.
Tuesday, March 20, 2007
Shabby Chic Cocktail Tray

This Shabby chic Drink Tray is an easy DIY project that will add a huge designer impact in your home. Creating Shabby Chic cocktail tray is an easy project that can be accomplished in one weekend.
To start this Shabby Chic Drink Tray Paint Technique project you will need to spend at least one weekend, but maybe a little more time.
Any real wood or cheap plain fake wood Drink Trays are perfect for this Shabby Chic Paint Technique.
You can use a pre made Drink Tray.
Here is a list of supplies you will need to start making these Shabby Chic Drink Tray:
Primer Paint (2 colors: white and either sand or tan)
Roller paint brushes a variety of 2”, 3”, or 4” paintbrushes
Wood stain
Glaze
Sandpaper
Drop clothes
Cocktail Tray
Now, start sanding the surface of your plain Drink Tray. Once you have the surface lightly sanded, you should wipe off the dust with a clean dry clothe. An old white t-shirt will work perfectly here.
Now, you are ready to put a coat of primer. If you are using a cheap fake wood Drink Tray this is a very important step. Your Shabby Chic Paint Technique will not stick to your surface if you don’t sand and then prime your cocktail tray surface.
If you want a rough more rustic Shabby Chic Drink Tray try putting the primer on with one of the 4” brushes. This will give texture and create the look of real wood. If you prefer the smoother look you can roll the paint on with any type of paint roller. A foam roller will create the smoothest surface.
Allow your primer to dry completely.
Put on a coat of your base paint. This is either a sand color or tan color. You could do a yellowish tan. This paint should not be the actual color you want your desk to end up, but the color you want to show through when you finish the Shabby Chic Drink Tray.
Now you are ready to paint your surface with the real color you wish it to be. I always recommend painting a white or antique white color for true Shabby Chic cocktail tray.
Don’t be scared to choose a bright white because the Shabby Chic Drink Tray Paint Technique process will tone down the appearance of the stark white considerably if you want.
Once your white shabby chic Drink Tray color has dried you are ready to start roughing it up. Start by using the sand paper to rough up edges and other areas that would typically be used over time.
Once you have finished sanding the cocktail tray surface wipe the surface down with a clean dry cloth. That old white t-shirt will work well here again. You can stop at this point, but if you want to go the extra mile you can use a mixture of ½ wood stain and ½ glaze to darken your piece. This darkening will mimic years of dirt and the aging process. If you use a antique white you do not have to do this.
Start by mixing you paint and glaze in a plastic container. Use a white rag or another old t-shirt to rub the stain onto the Drink Tray.
You can do this process until you achieve the Shabby Chic Drink Tray look you want for your vintage bar, retro kitchen, or timeless dining room.
Thursday, March 15, 2007
Vintage Wood Crate Home Decor Projects
Looking for some great craft project to make out of your old Vintage Wood Fruit Crates? These simple ideas are a great way to get those Vintage Wood Fruit Crates out from your closet and out of the way in the garage. You can use these décor tips and ideas inside or outside!
Don’t feet limited to only Vintage Wood Fruit Crates. Many of these craft project can be made with New Wood Fruit Crates of all shapes and sizes. Simply use milk paint to age them
Organize Your Office Supplies
Ok, so I highly recommend cleaning your Vintage Wood Fruit Crates if they have been used out in the yard before this. Simply wipe them with some terpentine and then tongue oil. Let them dry before you apply the tongue oil.
Line the Vintage Wood Fruit Crates up on your shelving in your home office or even along the back of your desk. You can place pens, paper clips, notepads, and almost anything on them. You can also rest jars in there to keep your office supplies organized.
If you have a drill bit you could also drill a hole in the Vintage Wood Fruit Crates. Do this right below the first wood slat of the Wood Fruit Crate. Now, use a screw to attach the Vintage Wood Fruit Crates to the wall. This is a great way to add vertical storage to a small space.
You can also drill through the new Wood Fruit Crates.
Entry Way Bins
Large Vintage Wood Fruit Crates are the perfect way to keep the kids and all of their gear organized in your entryway or mudroom. Plus the kids can shut to hide clutter.
You can have the kids stencil their names on their own new Wood Fruit Crates. Slide them under a bench in the entry way and you won’t have anymore clutter on the floor.
You can also use the large Vintage Wood Fruit Crates to hold gloves, shoes, hats, and even toys. The Vintage Wood Fruit Crates will look great and hide away the mess.
Kitchen Storage
Traditional Vintage Wood Fruit Crates are perfect to use in the food pantry. You can use them to store potatoes and onions in place of less attractive bins. Just because it is the pantry does not mean that it doesn’t have to look good.
You can also use smaller Vintage Wood Fruit Crates on the kitchen counter or table and fill them with fruit. This make s a great centerpiece, adds storage to the kitchen, and even acts as great decoration. Pile those apple and oranges high and the kids can run by and grab one for as snack any time they want.
Tall thin Vintage Wood Fruit Crates are great as utensil holders in the kitchen. I recommend cleaning them and sealing the inside with some polyurethane to keep the porous surface closed. This way no bacteria or dirt will soak into the Vintage Wood Fruit Crates. You can also set a plastic cup inside to keep the utensils free from touching the bin.
Bathroom Storage
A large clean Vintage Wood Fruit Crates can make a beautiful way to display and store bath towels. Simple roll the towel up instead of folding them. You can place them vertically in the Vintage Wood Fruit Crates.
Small Vintage Wood Fruit Crates on the counter can hold hand towels.
Side Table with Storage
For a unique side table in the bedroom or den (living room) try using one or two of those oversized Vintage Wood Fruit Crates.
Now, All you need to do is place a large round piece of beveled glass on top. You could also use a piece of wood cut out in a circle.
You can put away off-season clothing or even throws in the storage side table.
Wednesday, March 14, 2007
Vintage Window Shutter Key Cabinet
This simple vintage window shutter Key Holder is a great way to add some stylish storage to your front hall or mudroom using a new or old wood shutter.
Who knew a wood shutter could also keep you really organized. The vintage look is timeless and well suited for many different styles. The added bonus is the extra storage this simple wood working Key Holder project will add to your home!
You can make this simple vintage window shutter Key Holder for about $100 or less, depending on how much you end up paying for your vintage window.
To Make a Storage Key Holder Out for a Vintage Window shutter You Will Need:
2X4’s
Screw on Eye hooks (how many you want)
Plywood
Screws
Power drill
Drill bits
Primer
Paint
Picture hanging Hooks (optional)
Paint brushes (in a variety of sizes)
Magnetic door hook
Piano Hinge
Vintage wood shutter
Now, the first step is to measure your vintage window shutter. Measure how wide and tall it is. I like to use smaller vintage window shutters for this simple craft project. They are perfect for holding keys, which are somewhat small.
Use your 2X4’s to build a frame the exact same size. Use you wood screws to screw the pieces of 2X4’s together like a box frame. Predrill the holes for the screws with your power drill to keep the wood from splitting.
Now, cut your plywood to the same size as your vintage window shutter as well.
Screw the plywood onto the back of the wood frame you built. You can do this step gain by predrill holes through the plywood another 2X4” frame. Insert your screws to hold them together.
Now, attach the vintage window shutter to the front of the Key Holder box. Do this by install a piano hinge on the left side of the frame. Attach one side to the frame you built and one side of the hinge to the vintage window shutter.
On the right side install your magnetic door hook. You could also use a hook and eye hook like you used to find on old screen doors.
Now, flip the vintage window shutter box five down. Install your picture hanging hooks on the back of the box. They should be attached into the plywood you put on the back.
Now, flip the box back over and lay it on it’s back on a flat work surface.
Now, lightly sand any areas needed on the wooden box and roof.
Wipe away any dust and prime it out.
Now, once the primer has dried you can paint the inside and outside of the Vintage Window shutter key Box.
Now, you need to take your screw on teacup hooks and install them inside of the key holder on the back piece of wood. Simple take a pencil and marker a dot where you would like them to be. Now, screw them into place and you can hang your keys on them!
To blend the front of the shutter and the key holder you built try painting the entire key cabinet out in some milk paint or flat wall paint. This will make it look professional and like one piece.
Tuesday, March 13, 2007
Vintage Purse Close Up


Just wanted to give you a close up of the vintage blue and green linen purse.
My mother and I named this bag the St. Simon's bag after St. Simons Island, Georgia.
Vintage Art Work

Check out this great vintage looking artwork you can make yourself. Simply make a linoleum print and you can turn any photo into a vintage looking piece of art.
Add an antique looking frame to complete.
Check out this video to learn how to make a linoleum print to create vintage art from any photograph you have.
Vintage Window Treatments

Want a fresh, vintage, and shabby chic look on your windows? Check this photo out. We hung a white on white striped roan shade along with a vintage looking polka dot white curtain together to get a shabby chic and timeless vintage looking window treatment in my neice's room.
She was so excited she fell alseep before we even finished.
Layer white on white for a great shabby chic window treatment that will last for years.
Vintage Purses

Made some more purses from that vintage purse pattern with my mother. Thought you might like to see them.
This sewing pattern is a vintage purse pattern from Sewing For Dumbies. It was super easy! The pink and white vintage looking purse is the first item I have ever sewn from an actual pattern.
Monday, March 12, 2007
Vinage McCoy Vase Turned Lamp
How to Make a Lamp Out of Vintage McCoy Vase.
I am always looking for ways to reuse damaged or chipped Vintage McCoy Vases. They are so much more affordable than McCoy Vases in perfect condition.
Anyone who collects Vintage McCoy Vases will love this simple lamp craft project. Empty Vintage McCoy Vases are a fun collectible that can be very easy to find.
An empty Vintage McCoy Vase is the perfect base for a lamp. Thanks to easy to install lamp kits you can do this project at home in no time.
You can buy a lamp kit at almost any arts and craft stores as well as at most hardware store. Generally you should expect to pay about $10 to $15 for the lamp kit. You need to provide your own small accent lampshade, light bulb, and lamp base!
To Make a Lamp Out of Vintage McCoy Vase You Will Need:
Vintage McCoy Vase
Power Drill
Glass or Ceramic Cutting Drill Bit
Lamp Kit
The first step is to completely clean out the inside of your empty Vintage McCoy Vases. I like to run some water into the vase, put a few drops of soap in, and then shake the bottle. Rinse it out with clean water.
Let your empty Vintage McCoy Vases sit out and dry completely; everyone knows water electricity does not mix.
Now, take your power drill, with the glass drill bit, and drill a small hole in the back bottom of the Vintage McCoy Vase. You want this hole to be right above the edge of the vase. This is where the electrical cord will be coming out of your vintage lamp. If you have this cord coming out form underneath your bottle your lamp will not be stable or sturdy.
Install you lamp kit follow their instructions. Each lamp kit product will be different and it is best to use their specific instructions. Run your electrical cord out of the hole n the bottom of your Vintage McCoy Vase.
Add a light bulb and a small white lampshade and you are set!
Tips:
-Don’t limit yourself to small sized Vintage McCoy Vase. There are reproduction Vintage Glass McCoy Vases in all sizes out there.
-A Vintage McCoy Vase is great for this project. The painted label covering the side of the bottle is perfect for a vintage themed kitchen, home office, or even a front hall.
-To save money you can use reproduction vases that look like vintage McCoy vases.
-You can also try bidding on Vintage McCoy vases on ebay, check out your local yard sales and flea n tique shops. You can also attend swap shows to trade to save money.
-Fill a clear empty McCoy Vase with fun objects like sand, marble, to add some weight to the base of the lamp. Stick to dry ingredients since this is a lamp!
Sunday, March 11, 2007
Vintage Wedding Favors
Here is a link to come wedding bell shaped chocolates that would be so perfect to use as a vintage themed wedding favor. Try making these wedding favors chocolates in white chocolate for a more vintage look.
You can package the wedding favor chocolates in clear bags and tie them shut with a vintage pink or blue ribbon. Vintage Velvet ribbons would also look great!
You can package the wedding favor chocolates in clear bags and tie them shut with a vintage pink or blue ribbon. Vintage Velvet ribbons would also look great!
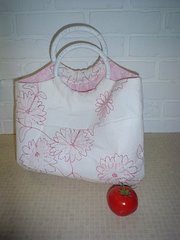
Antique Paint Technique for Vintage Wood Handles on Purse

Here is a video on how to do the shabby chic or white vintage finish on the pink and white vintage purse in the photo.
I am using the paint treatment on a vintage serving tray in the video. Be sure to prime your vintage wood handels for the purse first and let that dry.
I am using the paint treatment on a vintage serving tray in the video. Be sure to prime your vintage wood handels for the purse first and let that dry.
Vintage Frame Cork Board
Check out this video on how to take a vintage dresser mirror frame and turn it into a corkboard for your home office or your retro kitchen.
Vintage Button Table Runner
Check out this article for tips on how to use your vintage buttons to transform a table runner. You could also use these steps to make a vintae button tablecloth.
Enjoy!
Enjoy!
Welcome to Vintage Lifestyles
This is a website for a vintage lifestyle. Anyone who loves vintage weddings, vintage crafts, vintage home decor, and vintage everything should keep this site as one of their favorites.
Subscribe to:
Posts (Atom)